Scanning 35mm Panoramic Images
One of my most popular blogposts is this one where I talk about how I shoot 35mm panoramic images on my RB67. In a way that’s no surprise as the popularity of shooting panoramic images with cameras like the X-Pan and GX617 has skyrocketed, as has the price for those cameras. People are looking for alternatives to spending $5K+ to shoot panoramic imagery.
One of the most frequent questions I get asked is “how do you scan your panoramic 35mm negatives?”. The majority of the time that question arises because for folks that take/send their film to a lab find out that the lab doesn’t offer panoramic scanning services for 35mm due to machine restrictions, or, they charge a lot more for it. So folks looking for an alternative are often developing their film at home and scanning it with a flat bed for the first time, with the most common flatbed scanner being the Epson V600.
Since I happen to also scan with a V600, I thought I’d take a few minutes to share the 4 methods that I’ve tried and also the results of each. I know that others have had good results with DSLR or mirrorless camera scanning with a holder and a lightbox, but I still scan the “traditional” way with a flatbed scanner.
First, let me cover the 4 methods before I get into thoughts and comparisons.
Scanning with the stock plastic V600 35mm trays. This method does yield good results IF your film dries/cures perfectly flat. Unfortunately the majority of film stocks out there tend to have a bit of a curl to them, so that your film has a bit of a “cup” either upwards or downwards depending on how you insert the film in the holder.
Scanning with the stock plastic V600 35mm trays with an ANR (“Anti-Newtonring-Resistant”) glass insert laying on top of the film. This method ensures that the film is held flat to the scanning plane thanks to the weight of the ANR glass holding it down. The drawback here is that you are adding expense to have the ANR glass custom-cut to fit your plastic holder, and you are also adding another layer and element to the scan. You also have to ensure that your ANR glass is placed with the less shiny side down to avoid Newton Rings on the negative - this is where you have the shiny non-emulsion side of the film against shiny glass. It causes blobby-looking rings sometimes in your scans that look like the elevation rings of a topographical map.
Scanning with the negative straight on the scanner glass. This tends to be the most common way that people scan their panoramic 35mm images. The advantage here is that you can get the full film border in the scan if you want. Drawbacks include needing to tape the negative down to the glass (ugh), or having to use a separate piece of ANR glass over top of it to hold it flat down to the scanner glass. Also lining it up straight with the negative inside of the scanner’s usable scanning area can be tricky until you get used to it. One critical concern is the fact that the negative is straight on the glass means that it may not be in the area where the scanner is its sharpest. The scanner is designed to scan just ABOVE the glass at a few millimeters in height.
Scanning with the negative sandwiched between two pieces of ANR glass on top of the scanner glass. This method uses a second piece of ANR glass as a spacer to raise the level of the film field up a few millimeters, with a piece on top holding the film down flat. This is adding additional expense and complexity to your scans, with all of the problems I’ve mentioned about scanner alignment and having the ANR glass set properly with the correct sides facing in the correct direction.
Whew!
That’s a lot.
Sorry for the long read. Let’s get into the practical side of this with some real world examples. Here is a recent image I shot in Dayton, Ohio with the RB67 on Cinestill 50D film. The images below are straight off the scanner, with the exact same scan settings each in terms of black, middle, and white points. I used the stock Epson Scan program that comes with the scanner, and all three were scanned at the same 2400dpi resolution initially, then downsized to 2048 on the long side for viewing here in this blogpost.
Flip thru these first for a quick comparison, then I will separate each one out for some thoughts.


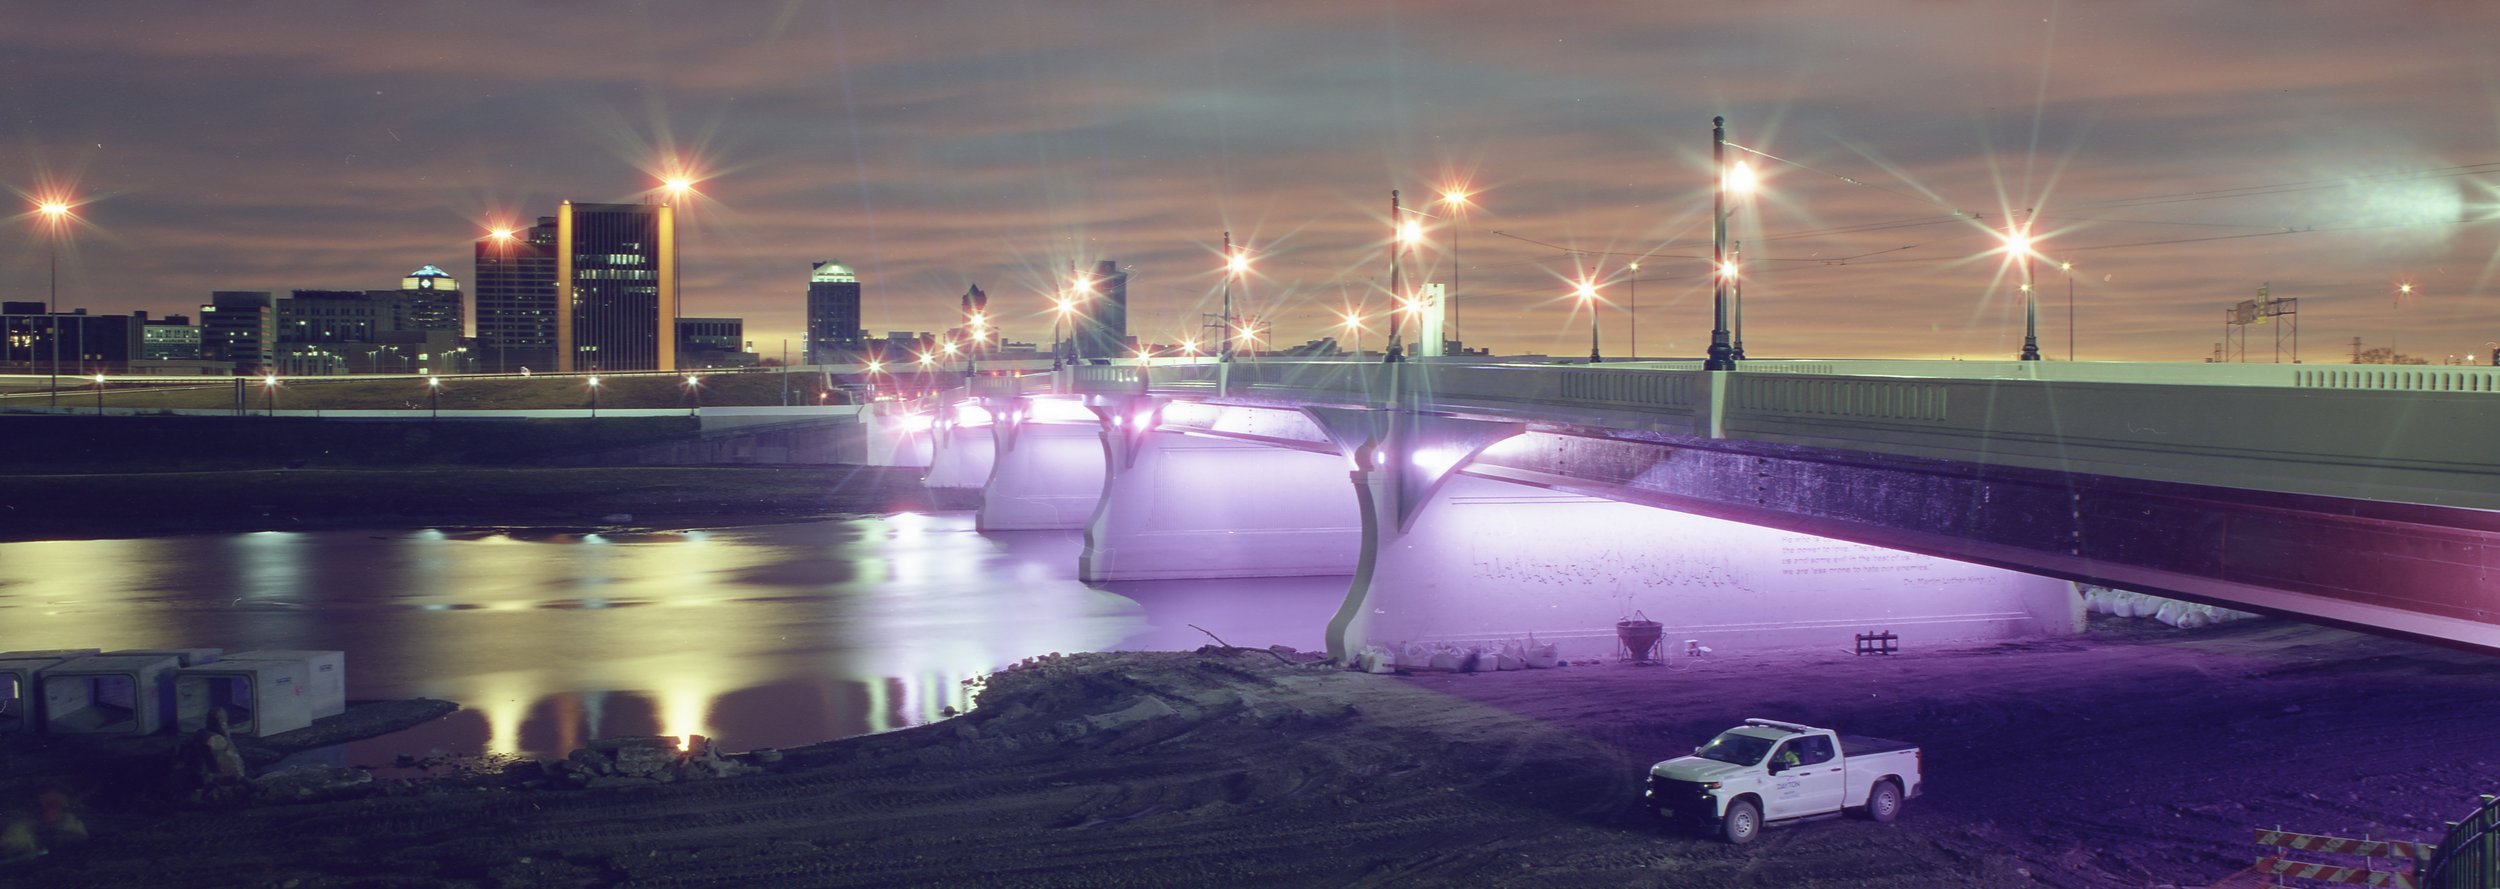


Image #1 - Factory Holder
For some reason, the colors “pop” way more compared to the other methods. My assumption is the fact that there is no additional piece of glass between the negative and the light in the hood of the scanner. Initial thoughts on sharpness are good, but we’ll get into that more in a bit. I usually sleeve my negatives after 2 hours of air drying, and then place them under a heavy book for 12-24 hours. This helped the Cinestill film lay fairly flat, which may have helped some.

Image #2 - Factory Holder with ANR Glass Insert
Colors are definitely more “muted” than using the factory insert alone, although easy to correct and edit in post if I want the same look. Same thoughts on initial sharpness as the factory holders image.

Image #3 - Straight on the Scanner Glass with a piece of ANR glass on top holding it flat
Same comment on the colors being muted. Here I feel like its just not quite as sharp or crisp with just a quick glance at the image, but I could be wrong. More on that in a bit.

Image #4 - Sandwiched between 2 Pieces of ANR Glass on top of the Scanner Glass
Colors look about the same as the prior 2 scans, even with an added layer of ANR glass. Sharpness looks “OK”, but we’ll zoom in on it and the others here next.
Next, lets take a closer look.
This is where I will make my comment about how much I HATE “pixel-peeping”. Pixel-peeping is when someone immediately zooms into an image at a 1x1 crop to see just how sharp or noiseless it is, and base most of their judgement about the image on that. To me that’s a real modern-day problem and can get in the way of just appreciating an image. That said, we are talking about scanning and trying to get the most out of your V600 panoramic scans, so its a necessary evil.
Here is a zoom into each of the full-rez scanned images, again next to each other for an easy initial comparison before we get into it.


Which method is the sharpest?
To me its clear as to which one is the worst, and that’s the scan with the negative flat on the glass. Both the writing on the wall and the “DAYTON” on the truck are not as crisp as any of the others. This result is more-than-likely caused by the negative film plane not being in the optimal spot for the scanner to resolve at its best.
The best scan appears to be the scan with the negative sandwiched between the 2 pieces of ANR glass, and that’s just barely better than the factory holder with ANR glass inserted into it. I think that’s because even with the ANR glass in the factory holder to hold it flat, its still not quite as flat as being sandwiched with the two pieces of glass - or the height of the holder from the factory isn’t perfect for my particular V600 machine. Even then its still pretty good.
Third-best is the factory holder, in this instance. I say “in this instance” because if the film wasn’t mostly flat to begin with, ie - if you had film that was badly curled - it might rank last behind the straight-on-the-glass method.
So what’s the take-away here?
If you are going to spend money over and above what you spend on the V600 scanner and buy a piece of ANR glass, get one that’s cut to fit your factory holder. If you get 2 pieces cut to fit you can use them to scan two strips of film at once in the holder, which makes for a much quicker process. I think this is the best compromise between time, expense, and quality. The difference between that method and the sandwich method is miniscule, and for most purposes you could make that up with a little bit of well-applied sharpening.
Below is the final edit after a bit of dust-cleaning, curve editing, and sharpening.
And below are some other shots from the last few weekends. I hope this has helped you decide how you would like to scan your images if you go down the rabbit hole of doing 35mm panoramas!
Thanks for reading, and as always drop a comment or reach out to me if you have any questions!
Jeremy
1.19.2023 EDIT: I’ve added another article to my blog about scanning 35mm panorama images with the Nikon CoolScan V here.